Storing, Accessing, and Displaying JSON Data in Local Storage
Introduction
In modern web development, storing data locally in a user’s browser is a powerful way to create dynamic and user-friendly applications. Whether you’re saving user preferences, caching data for offline use, or managing application state, local storage is a key tool in your toolkit. Combined with JSON (JavaScript Object Notation), a lightweight data format, you can easily store and retrieve structured data.
In this tutorial, you’ll learn how to do the following:
- Store JSON data in local storage.
- Retrieve and parse JSON data from local storage.
- Display the data dynamically on a webpage.
Now let's get right into it!
Tutorial
1. JSON (JavaScript Object Notation)
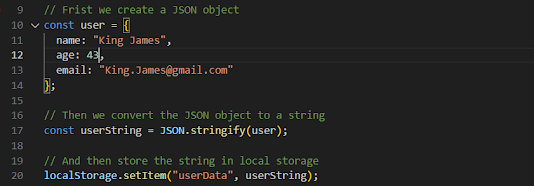
JSON is a lightweight data format that uses key-value pairs to represent data. It’s easy for humans to read and write, and it’s easy for machines to parse and generate. Now here’s an example of a JSON object:
Now to store JSON data in local storage, we first need to convert the JSON object into a string using JSON.stringify(). Here’s how we can do that:
In the example above:
- We create a JSON object called
user. - We convert the object to a string using
JSON.stringify(). - We store the string in local storage using
localStorage.setItem().
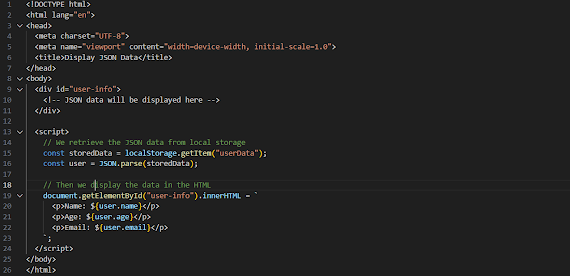
To retrieve the JSON data from local storage, we use localStorage.getItem() and then convert the string back into a JSON object using JSON.parse(). We can do this by:
Here:
- We retrieve the string from local storage using
localStorage.getItem(). - We convert the string back into a JSON object using
JSON.parse(). - We access the data using dot notation (e.g.,
user.name).
Now that we’ve retrieved the JSON data, let’s display it dynamically on a webpage. Here’s how we do this:
Here:
- We create a
<div>with the IDuser-infoto hold the JSON data. - We retrieve the JSON data from local storage and parse it.
- We use JavaScript to dynamically insert the data into the HTML using template literals.
Step 5: Managing Data Lifetime and Scope
Local storage data persists across browser sessions, but you may want to clear it under certain conditions. Here’s how we to manage local storage data:
1. Clear a Specific Item: localStorage.removeItem("userData");
2. Clear All Data: localStorage.clear();
3. Set an Expiration Date:
Local storage doesn’t have built-in expiration, but you can implement it manually by storing a timestamp alongside your data:
Take a look at these helpful Additional Resources:
https://developer.mozilla.org/en-US/docs/Web/API/Window/localStorage
JSON.org
https://www.json.org/json-en.html
W3Schools: JavaScript Local Storage
https://javascript.info/localstorage


Comments
Post a Comment